Container technology can be used for many things. It can be used for isolation, security, portability or resource management. One popular use of containers is to run a binary for one operating system on another operating system. We wondered if Linux lxc/lxd container technology would allow us to run the binary of rtpmidi for Ubuntu 22.04 on a Debian 12 system. We succeeded eventually.
This post outlines how we reached success. It is not necessarily a recommendation to follow this path. There are a lot of steps, and they can be confusing. But we are going to write down what we learned anyway.
Background
Our rtpmidi program sends and receives packets on a network, it sends and receives MIDI through ALSA and it has a GUI that can be X11 or Wayland.
Our goal then, is to run a container with Ubuntu 22.04 that uses a host Debian 12 to provides the following services.
- network access to our LAN
- access to ALSA /dev/snd/seq
- access to the X11 socket at /tmp/.X11-unix/X0
Terminology
In container terminology, there is a HOST and the container is a GUEST. The HOST is your laptop or computer. The GUEST is the operating system running inside a container.
In the rest of this article, when we issue commands on the HOST they will look like this.
user@host: $ cmd
And when we issue commands in the GUEST, they will look like this.
ubuntu@guest: $ cmd
LXC or LXD
Linux has two related container technologies. LXC is a low-level interface to running containers. There is a way to run containers in "priveleged" mode, where they have access to the root of the HOST operating system. There is also a facility to use 'unpriveleged' containers that map resources to a user on the HOST operating system.
We ran into two problems with LXC.
- using a privileged container, we could not figure out how to map the X11 socket correctly
- using an unprivileged container, we could not figure out how to map ALSA /dev/snd/seq to the container
LXD
LXD is built on-top of LXC and provides a daemon (hence, LXD) for running containers. This makes it easier to manage LXC containers.
LXD has a facility to create resource profiles that ease the launch and set-up of the container. This was a key step to success. The resulting profile appears below. (Thanks to https://blog.simos.info/running-x11-software-in-lxd-containers/ for some key points to getting this to work.)
config:
  environment.DISPLAY: :0
  raw.idmap: both 1000 1000
description: GUI LXD profile
devices:
  X0:
    path: /tmp/.X11-unix/X0
    source: /tmp/.X11-unix/X0
    type: disk
  seq:
    path: /dev/snd/seq
    source: /dev/snd/seq
    type: unix-char
    gid: 29
  timer:
    path: /dev/snd/timer
    source: /dev/snd/timer
    type: unix-char
    gid: 29
  eth0:
    name: eth0
    nictype: macvlan
    parent: enx00e04cc2a373
    type: nic
name: guimidi
used_by:
- We want X11 applications inside the container to talk to the X11 server of the HOST. The
X0clause maps the Unix Socket to the container. - We want the ALSA Sequencer and Timer devices of the HOST to be mapped to inside the container. We also want the GID of these devices to be mapped to 29 (the "audio" group) instead of a subordinate GID in the HOST.
- We want network device
eth0of the container to be mapped to the ETHERNET adapter of the HOST. This is the parent device. To find the parent on your system use the command below and find the ethernet device name.
user@host: $ ip link show
How to use the profile
Copy the above profile into a file named guimidi.txt. Then create a new LXD profile named guidmidi and put the contents into it.
user@host: $ sudo lxc profile create guimidi
user@host: cat guimidi.txt | sudo lxc profile edit guimidi
user@host: sudo lxc launch --profile default --profile guimidi ubuntu:22.04 gui2204-nine
To enter your container and run a shell in it.
user@host: sudo lxc exec gui2204-nine -- sudo --user ubuntu --login
ubuntu@gui2204-nine: $ xclock
A Note About Networking
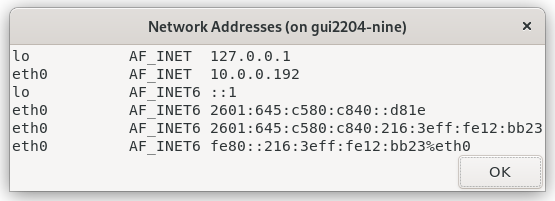
By default, an LXD container has access to the internet through a bridge that give the container an IP address in the 10.171.xxx.xxx range. On our network, the other computers have an IP address in the 10.0.0.XXX range. Bonjour is not able to see across the subnets, so that our rtpmidi cannot find the Mac computer in the 10.0.0.XXX range.
The solution we found was to use an "macvlan" container NIC type. This type of NIC introduces a new MAC on your network that can receive its own IP address. On our system, it received the address 10.0.0.192. This allowed rtpmidi inside the container to see other computers on the network.
Ref: https://blog.simos.info/how-to-make-your-lxd-container-get-ip-addresses-from-your-lan/
A Warning about WiFi versus Ethernet
It is not possible for the NIC type "macvlan" to work correctly with a WiFi network interface. When you authorize your computer, your router authorizes the NIC of your WiFi device. The new MAC for the "macvlan" is not recognized by your router and will be rejected.
See "Warning #1" in the previous reference (https://blog.simos.info/how-to-make-your-lxd-container-get-ip-addresses-from-your-lan/)
Preparing the Container Environment
The following were all required.
ubuntu@guest: $ sudo apt update
ubuntu@guest: $ sudo apt install avahi-utils
ubuntu@guest: $ sudo apt x11-apps
ubuntu@guest: $ sudo apt install ./rtpmidi_1.1.2-ubuntu-22.04_arm64.deb
apt update: this updates the system so that "libworkqueue0" and others can be found.avahi-client3: this was necessary to start the Avahi (Bonjour) daemon in the container.x11-apps: to get xclock for testing X11 configurationrtpmidi: install the rtpmidi program and its dependencies
My suggestion is to verify each of the services the container needs from the host individually, before trying to run the program.
- Test
/dev/snd/seqby runningaconnect -i -o -lin the container. This will let you know if the ALSA Sequencer interface was found. - Test
avahiwithavahi-browse -a. If it doesn't show anything then Avahi (Bonjour) isn't working correctly. You should see computers and your other network-midi devices on the network. - Test X11 with
xclock.
X11 failures - Xauthority
While we could see that the X11 socket was mapped to /tmp/.X11-unix/X0 inside the container, we had difficulty getting X11 to work. Our test was to see if we could run xclock.
ubuntu@guest: $ xclock
If we could run it, then we knew X11 was working. It turned out that the Xauthority cookie is not transferred. This must be done once per X11 session. Here's how we got around that.
On the HOST, find the Xauthority file of your session (set by GDM on Debian 12). Copy its contents somewhere that is reachable by the HOST and the GUEST.
user@host: $ printenv XAUTHORITY
/run/user/1000/.mutter-Xwaylandauth.C0B8K2
user@host: $ scp $XAUTHORITY someone@computer:xauthority.tmp
Then on the GUEST, copy this to your home. Then test xclock.
ubuntu@guest: $ scp someone@computer:xauthority.tmp ~/.Xauthority
ubuntu@guest: $ xclock
X11 failures - turning off security
An alternative to fixing the Xauthority cookie, is to simply turn off security in the X11 server.
user@host: $ xhost +
This allows anyone to connect. Using this technique is a good first-step in diagnosing whether the Xauthority cookie is actually the problem.
SNAPD and CPU consumption
In running Ubuntu22.04 as a guest, we ran into problems with snapd running and using up a lot of CPU. This was apparent by running the following command on the HOST.
user@host: $ top -c

   PID USER      PR  NI    VIRT    RES    SHR S  %CPU  %MEM     TIME+ COMMAND
  36903 165536    20   0 2263684 169720  17724 S  25.0   0.7   0:22.59 /usr/lib/snapd/snapd
Note the USER ID: it is 165536. This is the user ID of ROOT in the container, mapped to a subordinate user ID on the HOST.
The way we found to stop it was to issue the following commands in the GUEST.
ubuntu@guest: $ sudo systemctl disable snapd.service
ubuntu@guest: $ sudo systemctl disable snapd.socket
ubuntu@guest: $ sudo systemctl disable snapd.seeded.service
ubuntu@guest: $ sudo systemctl mask snapd.service
Thanks to (https://linuxblog.io/remove-snap-ubuntu-22-04-lts/) for this pointer.
Success! (?)
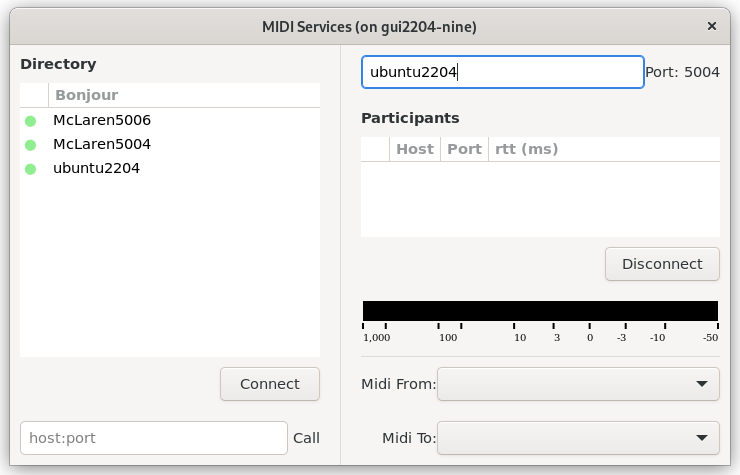
In the end, we were able to launch rtpmidi in our Ubuntu 22.04 container on our Debian 12 host with the following.
user@host: sudo lxc exec gui2204-nine -- sudo --user ubuntu --login
ubuntu@guest: $ /opt/rtpmidi_1.1.2-ubuntu22.04/bin/rtpmidi &
But with the caveat that the Xauthority credentials would need to be refreshed every GDM session.
Overall, I'd say this is a proof-of-concept, but the complexity makes this not ready for prime-time.
If you (the reader) gets a little further along in simplifying this set-up, please share it back here so that others can learn from you.