The Linux ALSA MIDI subsystem has a lot of capabilities and it takes a while to learn all of the bits and pieces that are available. Such was the case when one of our customers wanted to connect Reaper to an external RTP-MIDI capable device (a Behringer X-Touch). The solution was the snd-virmidi kernel module. This post will describe what snd-virmidi does and how it can be used to bridge different types of software.
The types of Linux device Access
MIDI hardware devices connected to Linux show up through simultaneously through two distinct mechanisms.
- the RAW MIDI interface
- the SEQ (sequencer) MIDI interface
The figure below illustrates this situation. On the left is the “RAW” MIDI software interface and on the right is the “SEQ” MIDI interface. When an external device is connected, these two distinct interfaces are created for it.

The RAW interface
The RAW interface for software programs presents MIDI data as an uninterpreted byte stream. A ‘noteOn’ message will appear as a sequence of bytes (0x90, 0x??, 0x??) for a software program to interpret according to the MIDI standard. The stream of bytes on this interface is not timestamped and is not interpreted.
The list of devices presenting RAW interfaces can be observed with the amidi command.
$ amidi -lThe command above would list the MIDI hardware devices with their RAW interface ids (“hw:4,0,0”) and their names (“MPKmini2”).
The SEQ interface
The SEQ interface for software programs presents MIDI data as events. Each event becomes a C language structure with types and fields. In contrast to the RAW interface, SEQ events are given high-resolution timestamps.
This interface makes it easier for software programs to interoperate. The routing of events between programs can be handled by commands and function calls.
The list of SEQ interfaces in your system can be seen with the aconnect command.
$ aconnect -i -o -lEndpoints in the SEQ subsystem are identified by a Client number as well as a name. For instance, the “MPKmini2” keyboard has client id “32” in our previous example.
The figure below illustrates how two programs might work together using the SEQ interface. Consider two software programs: SW1 might be an arpeggiator (turning MIDI note events into a series of note events) and SW2 might be a software synth turning note events into audio output.

SW1 is configured to “read” from 32:0, the external keyboard. Its arpeggiated output 128:0 could be configured to connect to 129:0, the input to SW2 – the software synth.
These connections can be made external to the programs with the aconnect command.
$ aconnect 32:0 128:0
$ aconnect 128:0 129:0
Connections can be one-to-one, one-to-many or many-to-one. Connections, or “patches” can also be made with GUI software tools. Once such tool is qjackctl.
The versatility of the SEQ interface makes it nice for writing modular software tools. However, some tools prefer the RAW interface, and some tools written for multiple platforms (Windows and Linux, etc.) are more easily ported using the RAW interface.
Tools favor one interface or the other
Software MIDI tools tend to favor one interface or the other.
For instance, McLaren Labs’ rtpmidi is implemented using the SEQ interface. It does this to take advantage of high-resolution timing information, but also to allow multi-tool routing.
The diagram below shows the connections involved for sending note events from the MPKmini2 to a network attached device using McLaren Labs’ rtpmidi.

Reaper is a well-known DAW that can be used on a number of different operating systems. On Linux, it opens up MIDI devices using the RAW interface. The diagram below illustrates the data topology when Reaper accesses an external keyboard.

Bitwig is another application that opens MIDI devices using the RAW interface. If you were to use Bitwig with an MPKmini2 as a MIDI input device, the connections would look like this.

Creating MIDI set-ups that need both RAW and SEQ interfaces
What if you have software that wants to open a RAW interface (like Reaper) but you also want to use tools that only understand the SEQ interface. Then there is a special kernel module that can come to your rescue. It is called snd-virmidi (or Virtual MIDI).
In most Linux distributions the Virtual MIDI module is not loaded by default. It can be started up by using the modprobe command. The following command starts up the Virtual MIDI module. The snd_index argument says what the first device card number should be.
$ sudo modprobe snd-virmidi snd_index=1The Virtual MIDI module creates a number of devices that live in *both* the RAW and the SEQ side. Data sent in the RAW side comes out of the SEQ side, and events sent into the SEQ side come out as bytes on the RAW side.
The picture below illustrates the situation after plugging in the MPKmini2 and issuing the modprobe command. In addition to the keyboard, there are four new devices that bridge the RAW and the SEQ sides. These interfaces are available for reading and writing in software programs.

These devices allow a software like Reaper to open a RAW device and interface with a SEQ device, or vice versa.
So let’s say you want to use Reaper with McLaren Labs’ rtpmidi to talk to a network-attached RTP-MIDI device. A virtual MIDI interface would do the trick, and on the SEQ side you can connect the corresponding VirtualMIDI port to the rtpmidi port.

Reaper to the Behringer X-Touch
We are now ready to use all that we have learned to connect Reaper to the Behringer X-Touch. The X-Touch is a versatile control surface. It can be combined with the X-Touch “extender” which adds 8 more sliders.
A unique feature of the X-Touch is that it directly implements RTP-MIDI and has an Ethernet connection. Interestingly, in a combined set-up an X-Touch and X-TouchExtender will have separate IP addresses.
A photo of an X-Touch and X-Touch-Extender is shown below. This was provided by our user, who figured all of this out. Notice how it consists of two pieces, with the “Extender” sitting on the right. Each X-Touch component has its own ethernet connection – as you can see in the white cables in the photo.
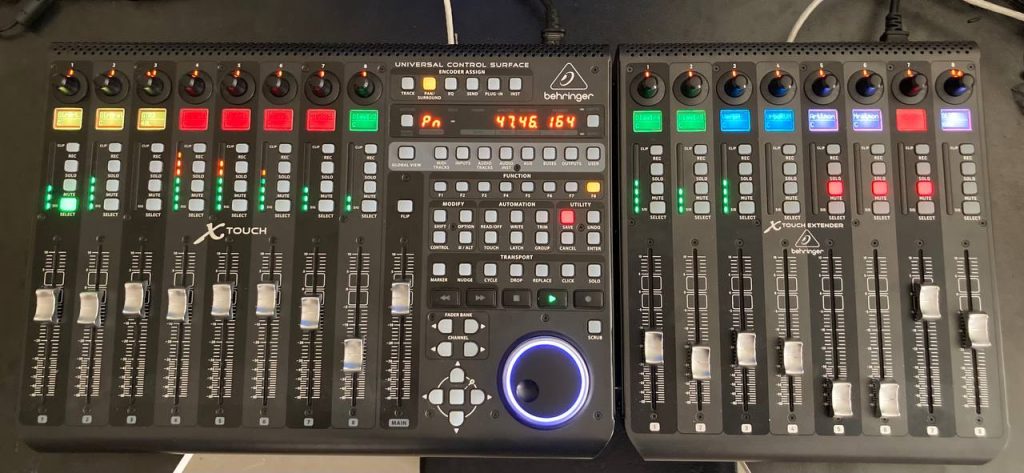
It should be pointed out that for the rest of this discussion, the X-Touch controllers were switched to SLAVE mode.
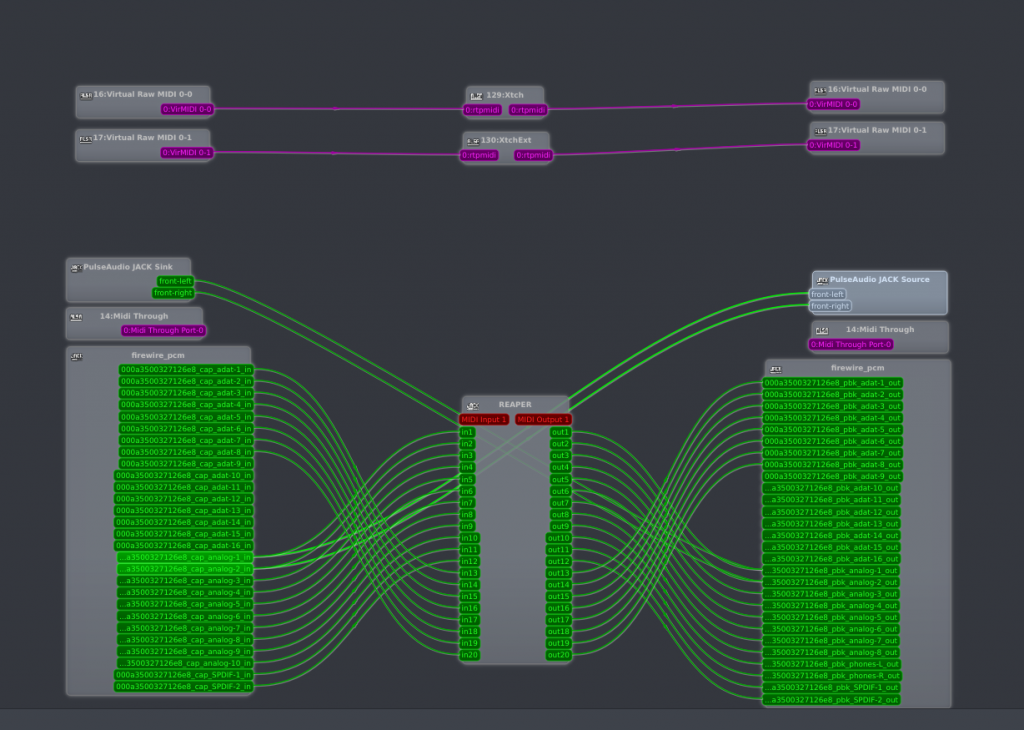
The desired “logical” configuration of the software and hardware is shown in the figure below. In this configuration, there is a separate rtpmidi session for each X-Touch component (the “main” and the “Extender”). But, importantly, there is only ONE network cable connecting all of this together.

To start up the rtpmidi sessions, our user wrote the following BASH script.
#!/bin/sh

/opt/rtpmidi_2.0.2-debian12.5.0/bin/rtpmidi call 192.168.1.26:5004 -u 5004 -t 16:0 -p 16:0 -C Xtch &
/opt/rtpmidi_2.0.2-debian12.5.0/bin/rtpmidi call 192.168.1.27:5006 -u 5006 -t 17:0 -p 17:0 -C XtchExt &
The first line starts up the session for the “Xtouch”. It tells rtpmidi to name its ALSA client “Xtch”. It then “calls” the Xtouch on the given IP address and port 5004.
The second line starts up the session for the Xtouch-Extender. It tells rtpmidi to name its ALSA client “XtchExt”. It then “calls”Xtouch-Extender at the given IP address and port 5006.
The Reaper application is configured to access the appropriate RAW midi interfaces that connect through to the rtpmidi sessions accessing the two Xtouches.
The “qjackctl” configuration for this is shown below. You can see that “qjackctl” knows the logical names “Xtch” and “XtchExt” that were assigned in the startup script.
A gotcha: Bandwidth Throttling
Our user was reporting some promising results, but had noticed occasional missed events. He also noticed, that when he used a slower network interface card the problems went away.
This led him to believe that perhaps the Xtouch would perform more reliably with slower network traffic. One way to limit network traffic is with the network shaping tool “trickle”.
After installing the trickle tool, the BASH start-up script looks like the following.
#!/bin/sh

trickle -u 100 /opt/rtpmidi_2.0.2-debian12.5.0/bin/rtpmidi call 192.168.1.26:5004 -u 5004 -t 16:0 -p 16:0 -C Xtch &
trickle -u 100 /opt/rtpmidi_2.0.2-debian12.5.0/bin/rtpmidi call 192.168.1.27:5006 -u 5006 -t 17:0 -p 17:0 -C XtchExt &
This limits the bandwidth in and out of the rtpmidi session to 100 KB/s.
Our user reported that with this bandwidth limitation, everything is working reliably for extended periods of time.
Conclusion
The story described here began when our “super-user” wanted to connect Reaper (on Linux) to an Xtouch over Ethernet using McLaren Labs’ rtpmidi. The Virtual Midi (snd-virmidi) kernel module makes it possible to bridge the two software interfaces that are provided for MIDI devices: RAW and SEQ.
The RAW interface is used by programs that operate on native MIDI byte streams, the SEQ interface is preferred by software that operates on “events”. The SEQ interface also does most of the work of routing MIDI so that it is easy to create graphs of MIDI sources and sinks.
The Behringer X-Touch is a pretty neat device, and the fact that it supports RTP-MIDI directly makes it easy to network. Running on Linux, a nice set-up that includes Reaper and the X-touch connected over the network is facilitated by McLaren Labs’ rtpmidi program.
While it may seem like a lot of moving pieces, we really like the way a very customized solution is composed from the tools. Reaper is the cockpit, VirtualMIDI is bridging software, rtpmidi is providing network transport and the X-Touch is providing a responsive control surface. And it all works over the network.
Special Thanks
A special thanks to our user, Илья Кузнецов (zloy.technic), a record-mix engineer, who patiently worked through all the issues of setting this up! He provided the inspiration for using Reaper with our software. Along the way I think that both he and I learned some new things about the very powerful and capable ALSA MIDI system.
Addendum: how to determine if your system has VirtualMidi
The VirtualMIDI kernel module, if present on your system, resides somewhere in /usr/lib/modules and will be called snd-virmidi.ko or snd-virmidi.ko.xz.
To see if it is installed on your system, use this command.
$ find /usr/lib/modules -name snd-virmidi\* -print